![]()
Labs: 1, 2, 3, 4, 5, 6, 7, 8, 9, 10, 11, 12, 13, 14.
- Before class reading
- Setup of the running example
- GitLab issues
- Creating the branch in Git
-
Connecting commits with issues and
git commit --amend - Pushing a new branch
- Exercise I
- Exercise II: hot-fix
- Commit graph
- Merge requests
- Merging on the command line
- Viewing list of branches and branch deletion
- Merging upstream changes
- Graded tasks (deadline: May 15)
- Learning outcomes
The purpose of this lab is to demonstrate a key feature of Git: branches. They provide you with a powerful tool to manage day-to-day coding of team-developed software. But they can be useful in single-developer scenarios too.
Do not forget that the Before class reading is mandatory and there is a quiz that you are supposed to complete before coming to the labs.
Before class reading
Today’s software is rarely produced by a single person: it is a team-driven activity and the team members need tools to collaborate on the software. This lab will show you what Git offers you in terms of cooperation for teams of virtually any size. We will also see how GitLab integrates with Git and what tools it offers to simplify the management part of the job.
Typically, a team effort requires that multiple people can work on a shared codebase in such way that:
- the work of each team member is isolated,
- but it is possible to combine work of several team members effortlessly (at least in cases where their work is truly independent)
Git provides these features via branches. In fact, branches are a much more general concept, which is useful even in projects with a single developer. In this lab, we will have a look at how to use them.
Before we actually start …
Some things mentioned here should be already familiar from earlier labs. That is fine and intentional: we would like to present a coherent picture of how Git works now, which will be likely useful in your future jobs.
If you are already familiar with Git branching, you will probably notice that we are simplifying technical details considerably. Formally, branches are really just pointers to the nodes of the acyclic graph of commits etc., but we believe that is not crucial for this text (and it is covered in NSWI154).
Please make sure that you do not skip any step in the examples below as otherwise some of things would stop making sense and you would not see the effects we want you to see.
Git branches
Git has a concept of branches that represent a series of commits. So far, your commits were linear – every commit (except the very first and last, obviously) had one previous commit and one next commit, the ordering represented how the commits happened one after another in time.
Branching in Git allows you to break this linearity – a commit can have multiple successors: your work diverges and each branch follows its own course – for example, each one can be adding a different feature. A commit can also have two parents: you merge changes from the branches together.
A typical example of this is work in a team. Alice and Bob both work on the same project, sharing the same repository. Alice works on feature A, Bob works on feature B. They both started with the same commit (e.g., just after the previous version was released), but their work diverges: each adds functions for the feature they work on. Once they are satisfied with their work, they merge their changes – i.e., they combine their code to get a version which contains both features.
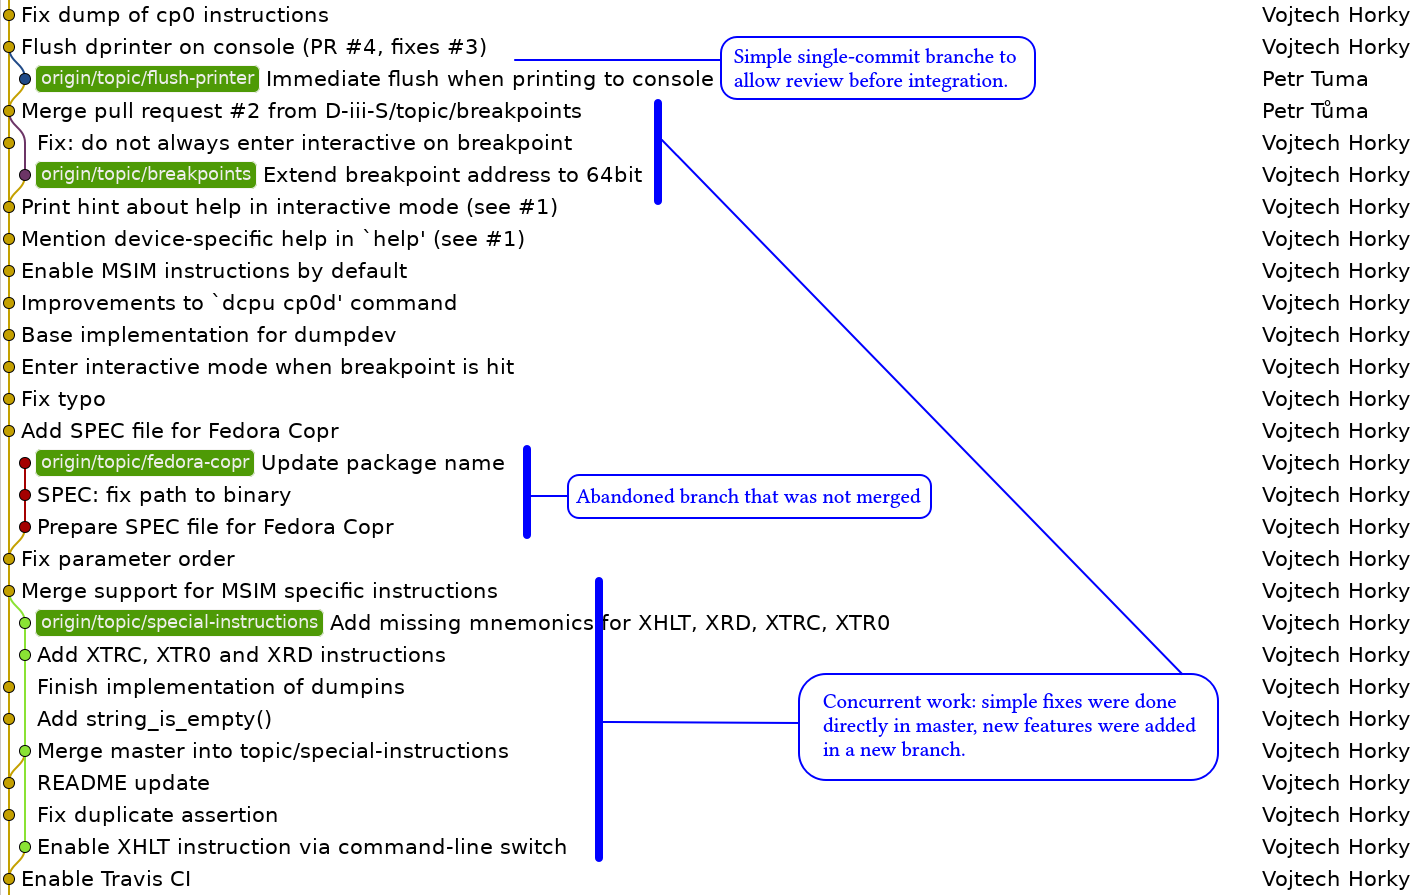
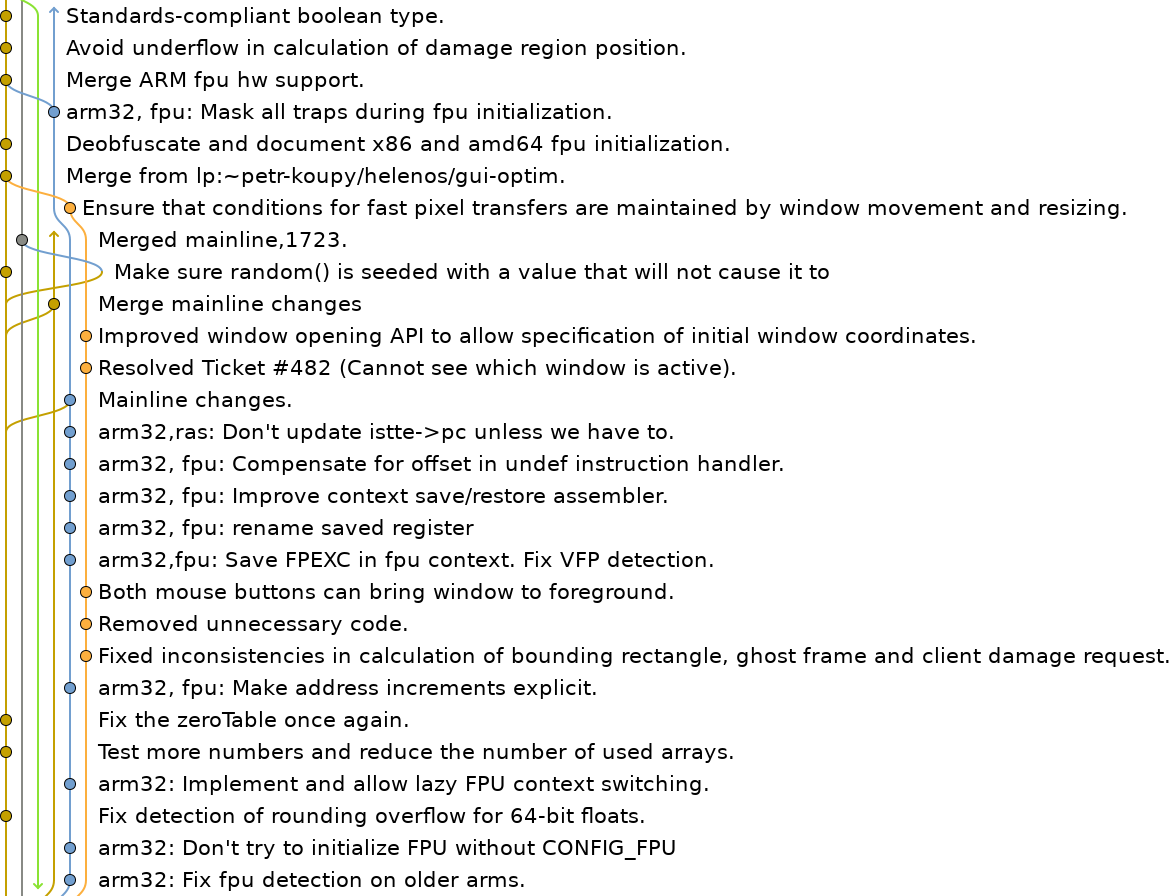
The following pictures show examples of simple branches (in MSIM) as well as a more complicated situation in a mid-size open-source project (HelenOS).
Actually, you have already worked with Git branches unaware of that.
When you cloned a repository, you created an exact copy of the state
that was on the server.
When you added new commits locally, they appeared on a branch which is
technically different from the branch on the server.
A push then joined these two branches again.
A pull works in the opposite direction: it brings new commits from the
server and merges them to your local branch.
But so far, the branches never diverged in your work – one branch was
always a prefix of the other one, so the merges were implicit and all the
branching was completely transparent.
Commit messages (again)
Read How to Write a Git Commit Message by Chris Beams if you have not read it yet. If you did, feel free to read it again.
We are now hopefully past the state when Git was an enemy, so we should work on improving our habits.
From now on, start using reasonable commit messages. Commit messages are a part of the development and are almost as important as the code they refer to. Especially in big teams.
We will start deducting points for messages such as “Upload a new file” or similar nonsenses that carry no meaning. Let’s start practicing now.
Actually, if you have troubles naming your commit, you probably did too much in one commit. It is the same as with functions (yes, again!): if you cannot describe them in a single sentence, something is wrong.
GitLab issues
To keep track of the unresolved issues in our projects, we should record them permanently. In the sidebar, you should see a link to Issues for every GitLab project: following the link would tell you that The Issue Tracker is the place to add things that need to be improved or solved in a project. That is exactly what we need ;-).
Each issue has a title – think about it as an e-mail subject –, it has to summarize what is wrong or what needs to be done. You also need to provide a description – in some cases you might be thinking that title Error on empty input has it all. It does not! Always provide an example, and steps how to reproduce the issue.
Many projects even provide templates for gathering all the information that is needed.
Note the Markdown link there that brings you help for Markdown
formatting – knowing about ` and
``` is a must for every programmer :-).
For further reading, look up the query on how to write a good bug report in your favourite search engine and read at least one article about it. It is worth it. Seriously.
Feature branches
To keep your code healthy, many projects follow a simple rule:
commit as often as possible, but code in the main branch
(while the name is configurable, most of the time you will encounter
names master or main) must be always correct
(in the sense that all tests are passing).
If you are working on a new feature, start a new branch.
Work in that branch and merge your code into master only when
the feature is completed.
For some projects, pre-merge action often involves code review or
even load testing.
It has the clear advantage that whenever someone starts on a new branch, he can be reasonably sure that he is starting from a healthy code.
Depending on the project, there may be also extra branches like
development where merging does not require code review or a branch
named production that denotes the code that will be shipped
(possibly automatically) to the customer.
We recommend reading A Simple Git Branch Workflow (dev.to) if you are interested in more details how this model works.
We will follow the above for example in this lab. For each new feature (or a bugfix) we will start a new branch and merge it to the main one only after we have tested it.
Merge requests
Merge requests are an advanced feature of GitLab which targets big teams.
In big teams, code review is required before any code can be pushed to the
master branch.
Code review usually means that a senior developer views your code, comments on it and can ask for further modifications. Think about renaming functions, using different data structures or fixing documentation. Anything from functional bugs to usual customs of a given code.
Merge requests can be used for exactly that. Before you actually merge your code (i.e., push your changes from the feature branch to the main development branch), you can open a so-called merge request.
Merge requests are akin to issues: as a matter of fact, the forms for creating an issue and a merge request look quite similar. This is because Issues describe known problems (or feature requests), while merge requests describe how the problem was fixed. As GitLab states it, merge requests are a place to propose changes you’ve made to a project and discuss those changes with others.
It is a good practice to mention which issue the merge request closes (or issues that are related).
Again, Markdown formatting can be used.
In big teams, other developers would comment on your code as a part of the merge request and also automated checks would be run (you will set up automated checks in some of the next labs).
Even for personal repositories, merge requests can still make sense: they allow the developer to quickly check that everything is okay (i.e., that all files were actually committed etc.).
Merging upstream changes (keeping your branch up-to-date)
A feature branch allows you to work on a new feature without disrupting the main branch. But the work in the main branch still continues and you want to keep your branch up-to-date.
That is a very common task. You do not want to miss important updates which are happening in master. As a matter of fact, failing to keep your branch up-to-date with master can complicate merging later on. Depending on the size and activity of the project, it might make sense to merge with the main branch every week or even every day.
Keeping your branch synchronized is often referred to as merging from upstream as that refers to the parent project (branch).
You will see that this is not different at all from any other merging. It is only about choosing the right direction (i.e., your changes to the main branch or changes from the main branch to your feature branch).
Git will always help you with the merging and in most cases, it will be a completely automated process.
Before class quiz
The quiz file is available in the 12 folder of
this GitLab project.
Copy the right language mutation into your project as 12/before.md
(i.e., you will need to rename the file).
The questions and answers are part of that file, fill in the answers in
between the **[A1]** and **[/A1]** markers.
The before-12 pipeline on GitLab will test that your answers are in the
correct format.
It does not check for actual correctness (for obvious reasons).
Submit your before-class quiz before start of lab 12.
Setup of the running example
Ensure that you do not skip any step in the examples below as otherwise some of things would stop making sense and you would not see the effects we want you to see.
Create a fork of the teaching/nswi177/2022/common/csv-calc repository.
Throughout the lab we will work on the example in this repository. Do not forget to clone your fork (not the original repository). You will be making quite a lot of changes there.
This example will try to emulate work in a team – whenever we talk about a different feature (or a bug), imagine that you are working in a big team and the features/bugs are not single-line fixes, but multi-day effort of individual team members.
Look at the csv_calc.sh script and run it as described in the
README file.
Also read how the script works (that is in there too).
GitLab issues
Notice that the script prints an error message when the expression
is invalid.
For example, for ./csv_calc.sh 'sum=t01+' <example.csv.
However, exit code is always 0, denoting success.
This is bad practice, let us fix it.
However, people seldom have time to fix a problem at the moment when they discover it. It is therefore quite useful to keep track of all unresolved issues in a project, so that they will not be forgotten.
Open the home page of your fork in the browser. Create a new issue describing the problem. Explain the problem precisely, do not forget to set proper title.
Bugs seldom go alone. There are more issues with the code.
Let’s create an empty file precious.txt in our directory and
run
./csv_calc.sh 'sum=t01 )); rm -f precious.txt; : $(( 0 + 2' <example.csv
Oops, the file is gone. We managed to inject malicious code into the expression. If it were a real-world project, this would be a serious security problem.
Therefore, create another issue for this in your project. Again: use a descriptive title, provide a meaningful description. Really. Use this as a practice for the graded task.
View the list of your issues. Each issue should have a number next to it that we can reference later on.
Creating the branch in Git
We will follow the example from before-class reading in this lab. For each new feature (or a bug fix), we will start a new branch and merge it to the main one only after we have tested it.
We will start by fixing the bug with the exit code. Let’s create a branch for that and switch to that branch.
Bigger teams often have conventions for branch naming. Let us keep things
simple and use issue/N for branches that are
supposed to fix an issue with number N.
To create the branch, we will use git branch command.
git branch issue/1
This command does not do anything visible. It only marks the current (last) commit as the starting point for a new branch.
To actually switch to a new branch, we need to execute
git checkout issue/1
Right now, the switch has no visible effect - both master and issue/1 branches refer to the same state of files.
Now, write a fix for this issue. Hint. Solution.
Commit the change.
Connecting commits with issues and git commit --amend
Git is quite flexible when working with commits.
If you realize that you want to change the last commit, you can
git add files and then call git commit --amend.
It will open your text editor with the commit message
already filled-in so you can change it.
Warning: never --amend a commit that you have already pushed
to the server. That commit could be already cloned by someone else
and things would start to break (as a matter of fact, it would be
possible to fix things because the commits would basically behave
as branches but it is probably not something you want to do).
Also, if you have changed an already-pushed commit, you would need
to do a forced push to overwrite the commit on the server.
For many projects that is not possible on the master branch at all.
So, preferably avoid amending pushed commits.
Use this feature and add to your last commit fixes #1.
This will have two effects once you push this commit to GitLab.
First of all, the issue will contain a link to the commit and
the #1 in the commit message will become clickable to open
the mentioned issue.
Because our commit fixed the issue, we have added the special keyword
fixes to the commit message to automatically close the issue
(there are plenty
of issue closing patterns
out there).
The issue will be closed once the commit is merged to the master
branch. That makes a lot of sense: the issue might be fixed but until
the code is in the master branch, the program still contains the bug
(recall that usually master branch is the code that is shipped to the
customer).
Note that it serves too purposes – it saves time (we do not have to switch to the browser at all) and it provides a valuable reference to which commit was actually responsible for fixing the bug. Note that the issue on GitLab is not yet marked as fixed, as we didn’t push any commits to the GitLab yet.
You should not have any uncommitted changes in your project.
Let’s switch back to the master branch.
Check that the script (after the switch) does not contain your fix.
Note that if you have your script opened in a text editor, it should warn you about file being changed on disk. If not, reload the file manually. Hint.
Technically, git commit --amend creates a new commit in place of the original
one. That has several subtle implications, the most important is that the
histories before and after the amending are different ones from Git’s
perspective. This means that if you have already pushed the original commit,
you should not amend it, because it will be difficult to push the new commit
(because it doesn’t extend the history on the server).
Pushing a new branch
Switch back to the issue/1 branch and push it to GitLab.
If you run git push (as you were used to), Git will complain
that the current branch has no upstream branch.
It means (more or less) that you are pushing this branch for the
first time and Git wants to make sure how to name the branch
at the server.
Nice thing is that Git offers you the command to run to ensure the branch is pushed.
For now, ignore the link that GitLab sent you back.
Solution.Open your project in the browser again. Check that your issue now contains a link to the commit that mentioned it and on the homepage of the project, you can select which branch to display.
Exercise I
Second issue
Let’s now fix the second issue (the code-injection one). Create a new branch, resolve the issue and commit the fix.
Do not push the branch yet.
Some questions and thoughts:
- Why do you need to switch to master first? How would the branching
look like if you branch from
issue/1? Why is that bad? - To actually fix the issue, consider using the
printfcommand which works similarly toprintfyou may know from other languages (or to.formatfrom Python). The%qdirective is the one you are looking for. - Do not forget to include
closes #2(or similar) in the commit message.
Exercise II: hot-fix
Let’s assume that you just now noticed the typos in README.md
(form is not from and there are two typos).
We want to fix that right away and we will do it (just this one time) directly in master branch. This is often called hot-fix: something you need to fix ASAP and where breaking the usual habit of feature branch, code review, testing etc. is a hinderance instead of help.
So, switch to the master branch (you already committed the fix to issue #2, right?), fix the typos and commit it.
Push your changes from the master branch.
Commit graph
Open the Repository -> Graph page in your browser (from your project). It should show you your branches graphically.
You should see a new branch, issue/1 next to master that stem from the
same commit.
The graphical view is a good help if you get lost in a complicated branching model and you are not sure whether some changes should be visible or not in a specific branch.
The purpose is not to create a complicated graphs though sometimes it can be quite wild.
You can also use --graph parameter for git log to have a graphical
representation in the terminal.
Merge requests
Switch to the branch for the second issue and push it to GitLab, too.
You will need to use the --set-upstream switch again.
Notice that after the push, you ought to see a text informing you about opening a merge request with a link.
Open that link in your browser now.
You will notice that the merge request is not submitted yet. The title and description are pre-filled and they look similar to the form we have seen with issues.
Create the merge request now.
WARNING: Double-check the destination of the merge request. It has to be a branch in your repository, not the repository you forked from.
Let’s merge the request now (there is a big button for that).
Keep the default and do a merge (i.e., not a rebase nor a squash).
The merge request being closed, we should see a new commit in the master branch.
You may also look at the repository graph again to see how the commits look after the merge.
Check issues of your project now and note that the second issue should have been closed now. You can also check the details of the issue and notice how the commit is nicely connected to the issue.
Back in your local clone of the repository: do not forget to pull the latest changes from master (GitLab created the commit on the server only). Hint.
Merging on the command line
We will now merge the first issue directly on command line without opening a merge request. Because the merge request is always bound to some kind of a branch, you can always merge on the command line, too. Note again the dual approach which is omnipresent in Linux: you can use nice graphical UI, but also a fully automatable command-line interface.
First, we need to ensure that we are on the branch we want to merge into. Usually, that would be the master branch.
The actual merge is quite simple, indeed.
git merge issue/1
And it is done. Push the master branch again and check the repository graph now.
Note that the merge is actually just a commit that has two different
commits as parents (previous commits).
Indeed, the most of the options are similar in both subcommands.
Viewing list of branches and branch deletion
To view list of branches, we can simply call the following command.
git branch
Sometimes it is useful to view all branches including those on the remotes
(see later on) by adding -a.
Once the branch is merged, we can remove it to keep the list clean.
git branch -d issue/1
Deleting a branch does not delete its commits when it was merged.
Instead, removing the branch simply removes the label that stated that
particular commits belonged to a particular branch.
That is why Git will not ask for confirmation with -d because you are not
discarding any actual code or any commits.
However, if the branch is not yet merged, Git will refuse to delete the
it (with an error message stating that the branch is not fully merged
and a hint to use capital -D if you really wish to delete it).
Merging upstream changes
Next, we will simulate that work in the upstream repository (i.e., the one you forked from) continues and you want to keep your repository (your fork) up-to-date.
With Git, all this is possible and (maybe surprisingly) there is very little difference whether you merge your own (local) branch or changes of someone else working in a completely different fork.
To merge changes from a different repository than the default one (e.g., a different project on GitLab), we need to set-up so called remotes.
A remote is a Git name for saying that your local clone also knows about other forks and it can tell you whether there are differences. Again, this is an overly simplified way of looking at things, but is sufficient for the how-do-you-do of Git remotes. Usually you expect that the remotes share a common ancestor, i.e. the initial commits are the same across remotes.
To see your remotes, run (inside your local clone of your fork of the examples repository)
git remote
It would probably print only origin. That is the default remote: when you
do git pull or git push, it uses origin. Thus, you were using remotes
even without knowing about it ;-).
Running it with -v (for verbose) will print what are the specific URLs where the remote is located.
As a matter of fact, you will probably see two remotes now: one for push, one for
fetch (pull). You can even configure Git to pull from a different repository than
you are pushing too.
Not very useful for us at the moment, though.
To see even more details, try git remote show origin.
Adding another remote
Let us add a new remote to our repository. This will refer to a different project, so that we can compare our changes with theirs (again, a simplified view of things).
git remote add upstream git@gitlab.mff.cuni.cz:teaching/nswi177/2022/common/csv-calc.git
The above command added a remote named upstream that points to the
given address (i.e., the original project). Note that Git is silent in this case.
Run git remote again. How it changed?
Working with remotes
By adding the remote, no data were exchanged yet. You have to tell Git to do everything, nothing happens automagically. Note that if you ever encounter a different versioning system, Git will feel very low-level and perhaps even tedious to use. It is the price for its effectiveness and flexibility.
Let’s fetch the changes from our new remote now.
git fetch upstream
You should see the typical summary as when cloning/pulling changes in Git. This time it referred to data from the upstream repository.
However, in your working tree (i.e., the directory with your project), nothing changed. That is fine, we only asked to fetch the changes, not to apply them.
However, run git branch and git branch --all to see which
branches you have access to now.
Note that adding a remote does not start any communication with the
remote server, Git only writes down the configuration.
git fetch than actually retrieves the changes from the remote server.
Without git fetch, we would have no information about the actualy code
available on that particular remote.
Comparing branches (and merging them too)
Now, we will investigate how the newly added remote differs.
Let’s start with showing commits on the remote:
git log remotes/upstream/tests
As you can see, git log can show commits on a certain branch only
(yes, the remote/... is actually a branch name: after all, you have seen it in git branch --all).
And it also works on files (e.g. git log -- README.md).
It is quite powerful command indeed.
But we wanted to see how the code differs. That is actually even more important: you want to see which changes to the code were made and whether it would be possible to merge them at all.
git diff remotes/upstream/tests
You ought to see a patch that displays that the newly added remote differs in one file only: automated tests were added.
They look pretty good – we want them in our project, too.
Let’s merge the remote branch, then:
git merge remotes/upstream/tests
Since there shall be no conflicts (i.e., both branches – master and
remotes/upstream/tests – changed different files),
the merge should be automatically completed.
Check your project directory: is the tests.bats file there?
Note that you can change the merge commit message using --amend.
Resolving conflicts
Using the same approach, prepare for merge (i.e., do not run git merge yet)
with upstream/hotfix.
As you probably noticed, the second branch contains a typo fix. But you already fixed it (if not, fix it before merging!).
The merge will lead to so-called conflict: two developers touched the same file and made their individual modifications. We would need to resolve that manually.
That is quite common and there is no need to be afraid of it. Git is able to help you a lot – when there are changes to different parts of a file, Git is able to merge the changes without any problems. But when both branches change the same lines, it is up to you to resolve it. That is quite natural and you would be surprised how many times Git is able to merge things automatically.
Enough of theory, run the merge command now:
git merge remotes/upstream/hotfix
This merge will end with an error and Git will inform you about the conflict.
Review the output from the merge command.
Note how Git tries to help you what can be done…
Run also git status and investigate its output.
Now comes the tricky part of the whole workflow: you need to resolve the conflict. In our case, it is rather simple. For complex software, resolving a conflict can be a very tricky operation as you need to check several places and mentally combine the changes first. Having automated tests can help, but analytical thinking is certainly a plus.
Once you solve the conflict, you need to call git add (like with a normal
commit – a merge commit is still a commit, after all) to resolve the conflict.
git add README.md
To finish the merge, run git commit as with any normal commit.
Do not forget to push the changes to your repository.
How would the graphical representation of the commits in GitLab look like now?
Try to sketch it on a paper before opening the Graphs page in GitLab.
Graded tasks (deadline: May 15)
The graded tasks for this lab are a little different as we need to test your understanding of the system that you also use for task submission.
Please, read the task description carefully and follow the instructions closely. Many of the things cannot be tested automatically inside the GitLab pipelines, because they do not have access to the GitLab API and committing the API key anywhere is not possible in a secure manner.
12/csv_calc.sh (70 points)
Important: read the whole task description first as some details are explained later on.
Copy the csv_calc.sh script into your submission repository.
We expect that it will contain a fix for the exit code issue and the printf '%q' fix, too.
Issue
Create a GitLab issue for the following problem.
What happens if you re-create precious.txt (it was empty) and append the following
line to the input CSV Mayor Humdinger,0,0,0';rm -f precious.txt;:' and run again
the command from README.md?
To allow us automatically find your issues, add [task-malicious] to the
title of the issue (and ensure there is only one issue with this title in your project).
Branch
Create a separate branch for the issue, keep the naming issue/N.
Fix the issues.
Keep the branch for [task-malicious] unmerged, but push it to GitLab.
Ensure that we will be able to see origin/issue/XY branch when fetching your
clone (XY will obviously refer to your issue [task-malicious]).
Your (preferably) last commit in [task-malicious] branch shall contain a commit
message that automatically closes the issue.
Do not merge the [task-malicious] branch – we will merge it as part of the
evaluation and check that it closed the issue.
Tests
The tests try to detect in which branch they are executed and run only the relevant parts of the pipeline. If you misname your branch or there are multiple similarly named branches, wrong tests may be executed. Use common sense to check that the right ones are running.
Reverting things…
If you manage to merge a branch you were not supposed to merge etc., do not worry. We recommend you remove the branches via GitLab UI (where possible), remove the script and start again with a new commit.
Please, ensure that you rename the related issues, so that the query above
(with curl) returns only the last issues that we are supposed to use.
12/UPSTREAM.md (30 points)
You perhaps noticed that your submission repository is actually a fork of another one. (That was for technical reasons as it simplified the creation of the repository for us.)
But it means that you can merge from it a change from us.
It now contains file 12/UPSTREAM.md with an artificial content.
Merge this file into your repository. Do not rebase or squash, do a normal merge, please.
Do not copy the file, but use Git to perform the merge.
As with other Git-related tasks: tests may start to fail after some time (recall that GitLab clones only recent history), That is fine as long as the test was passing at some point.
Learning outcomes
Conceptual knowledge
Conceptual knowledge is about understanding the meaning and context of given terms and putting them into context. Therefore, you should be able to …
-
explain what is a Git branch
-
explain what is a feature branch
-
explain what is a merge (pull) request and why it is useful
-
explain what is meant by upstream repository (project)
-
explain differences between a project fork and repository clone
-
explain what is a Git remote
-
explain what is a Git merge conflict, how it can occur and what options the developer has for solving it
Practical skills
Practical skills is usually about usage of given programs to solve various tasks. Therefore, you should be able to …
-
create GitLab issue
-
create Git branch
-
create merge request from a feature branch on GitLab
-
switch between Git branches
-
merge Git branches
-
fix Git merge conflicts
-
setup Git remotes