![]()
Labs: 1, 2, 3, 4, 5, 6, 7, 8, 9, 10, 11, 12, 13, 14.
Before actually diving into Linux, we need to explain how the course is organized and how you will be graded.
First steps inside Linux
Here we assume that you have your USB disk ready or you have your virtual machine running. Please, refer to another page on how to actually boot your machine from the USB.
Return to this page once you boot from the USB (or using any other method mentioned) to continue with this lab. Feel free to bring your laptop to the lab and let us help you with the booting.
Selecting your desktop environment
Once you boot from the USB disk, you can choose which desktop environment you will use.
On most operating systems, there are not many options on how to control your graphical interface. With Linux, there is a much wider choice. It ranges from rich environments with a plenty of eye-candy to very austere ones that do not even employ a mouse. Of course, there are dozens of environments somewhere in between.
Recall that this is easily possible, because the GUI is actually controlled by a normal application: it is not hard-wired into the system.
On your installation, you can choose from six different environments:
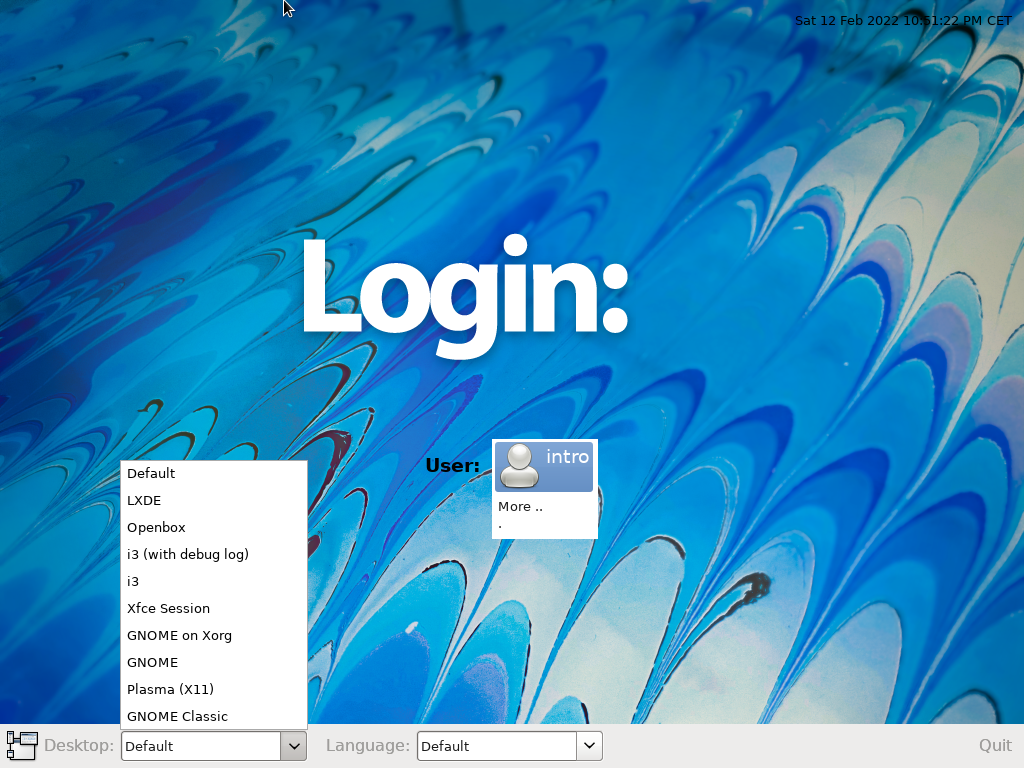
GNOME, Plasma (a.k.a. KDE), Xfce and LXDE represent mainstream desktop environments that should be familiar to any user coming from either Windows or Mac environments. The above ordering roughly corresponds to the amount of eye-candy they offer (and to the hardware requirements they need).
Openbox and i3 are special environments as they do not contain the traditional task bar with a list of windows and they require a bit more patience before they are mastered. On the other hand, the time investment, especially for i3 that is driven by keyboard only, pays back in a much more efficient usage of your computer.
We encourage you to try all of them. Login into the environment, determine how applications are launched and decide which environment you like the most. Note that the environments can be further customized – from the overall color scheme to keyboard shortcuts.
If you are unable to decide, Plasma is a good choice for ex-Windows users with decent hardware. Choose LXDE if your machine is shorter winded. And after a month of using these, switch to i3 to become a true power user.
Selecting your applications
Once you decide on your desktop environment, look around for other applications you will need.
Above all, look around for the text editors available. There are several popular graphical editors already installed as you can see on the following screenshot.
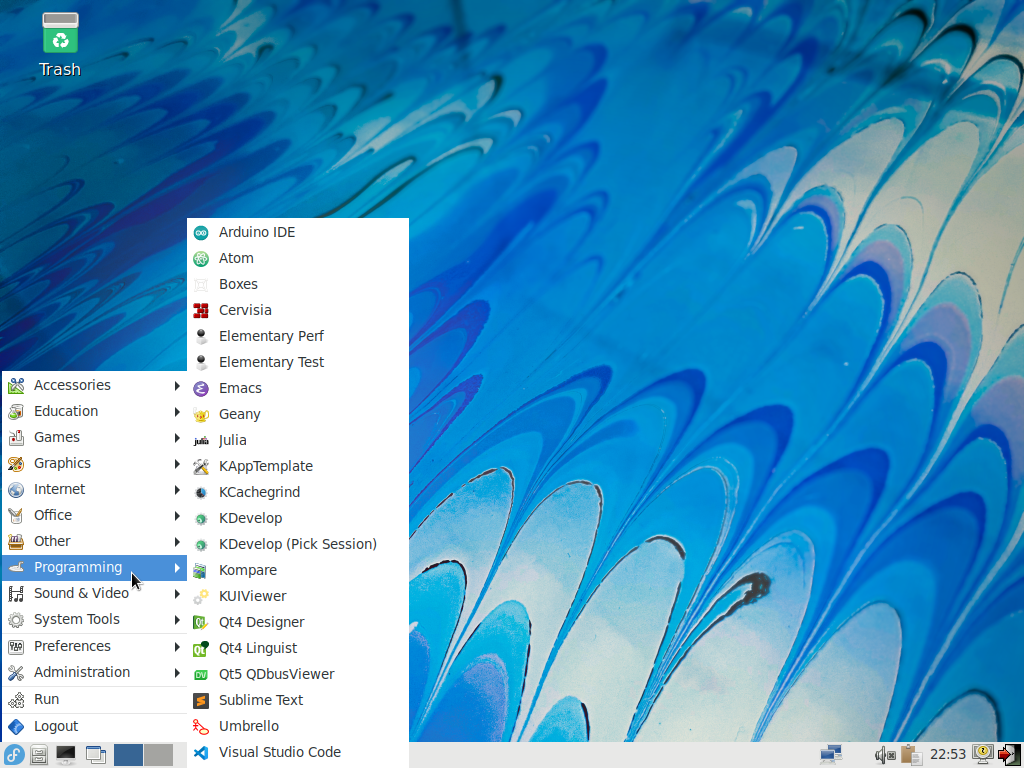
Note that other editors are available from the command-line: we will talk about these during the next lab.
Software project management essentials
We will now switch to a side track and talk about software projects in general.
Modern software is rarely a product of one-man teams. Rather, it is developed by large teams that can span several time zones or even continents.
Development in such teams requires that all developers have access to the (most up-to-date version of the) source code and that they can communicate with other members of the team efficiently.
There are many solutions to this: from e-mails and shared network disks to more sophisticated solutions. To prepare you a little for the software engineering practice, we will be using one of the more sophisticated solutions and that is GitLab.
GitLab offers a place where developers can share the source code, but also manage a list of existing bugs, keep documentation, and even automatically test their code. And since it can be integrated with other tools as well, for many companies as well as open source projects, GitLab became the central place for their product.
Furthermore, we can use its advantages even when working alone. Even if we would use it only as a smart backup for our source code at the beginning.
For this course, GitLab will also become the central place for many tasks. You will submit solutions to it and there is also the Forum project where you can ask questions.
There are other alternatives to GitLab offering similar features. We will be focusing on GitLab in this course, but the general principles apply to other tools, too.
Source code versioning tools
The central point of any software project is the source code. Without it, there is nothing to be executed. Therefore, extra care and tooling is provided for source code management itself.
GitLab itself is built around Git. Git is a versioning system. In layman terms, it means that it watches your files for changes and remembers previous versions of your files. It has the big advantage that you can freely update your code and still return to its older versions.
We will dedicate one of the labs to Git fully. Take this description as a very high-level overview so you can start working with Git the GUI-way in GitLab.
Practically, Git always works in a certain directory that typically represents one project. The user needs to tell Git which files are to be tracked and at which point to create a new version.
Git does not create the versions automatically as each version is supposed to capture a reasonable state of the project. Thus, for example, you create a new version (sometimes also called revision) once you add a new feature to your software. Or when you fix a bug. Or when you fix a typo in the documentation. Or even when you want to backup your work before going to lunch :-).
It allows you to create a reasonable history of the software that is small enough for reviewing (for example), but it does not preserve every small typo you made. Versioning does not replace undo/redo of your editor, it operates one level above that.
And when employed in a team, Git allows the cooperation of multiple users as it can
merge non-conflicting changes without manual intervention.
For example, if Alice makes a change to file alpha.txt and Bob at the same
time changes the file bravo.txt, Git allows Carol to pull changes from both of
them at the same time without any fear of overwriting the changes done by either of them.
Again, you will try this yourself in one of the next labs, at the moment you will be using only the web-based GUI. And since you will be the only user doing changes, there is no need to worry about possible conflicts.
Using MFF GitLab
For this course, we will be using the faculty instance of GitLab at https://gitlab.mff.cuni.cz. Please, do not confuse it with the instance at https://gitlab.com that you can freely use, but which is in no way connected with this course.
For login (username) you will be using your CAS credentials, i.e., the same ones as you use for SIS. Your first login will activate your account.
Please activate your account now, if you have not yet done so. Please, read our Q & A if you have trouble logging in.
First steps inside GitLab
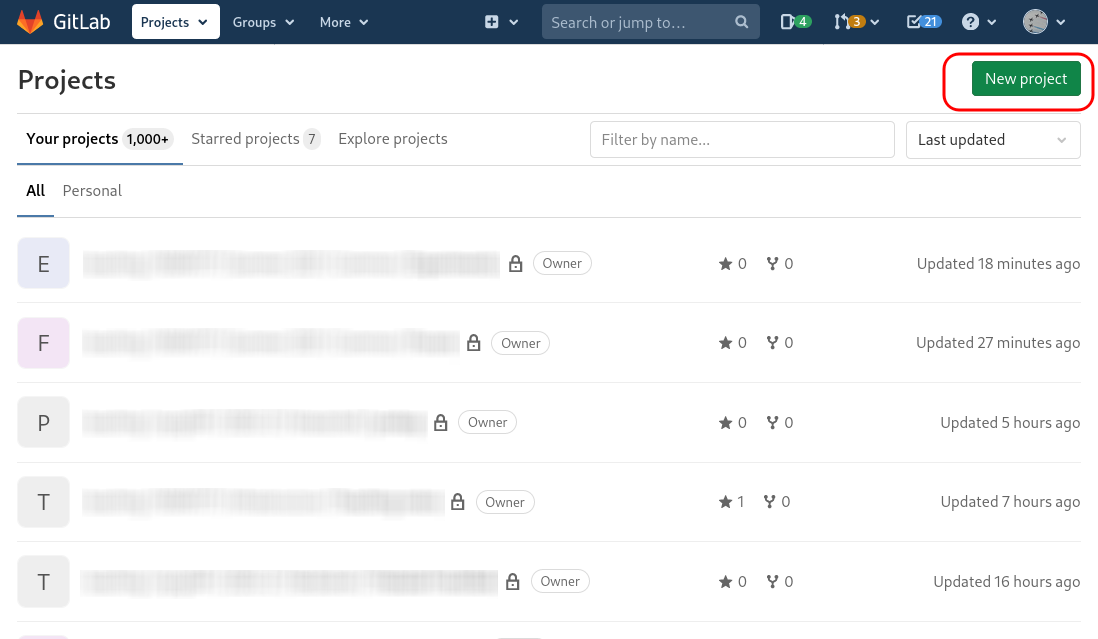
To quickly try GitLab (we will focus on it more in several labs), create a new project (create a Blank project). You need to fill in a project name, its slug (a short version of the name used in the URL), and its visibility. In the example screenshots below, we create a project with our source code from the introductory programming course. Do not forget to ensure that the project is initialized with a README.
![]()

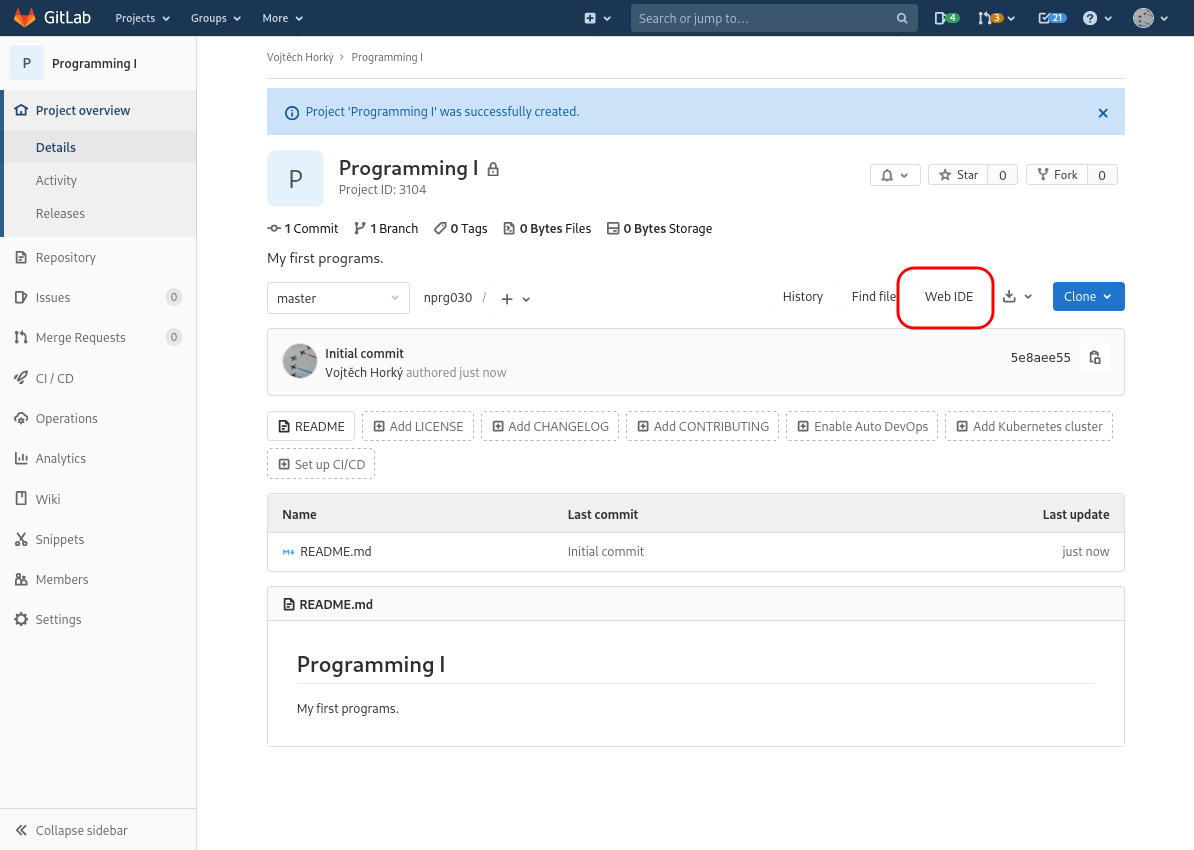
Now open Web IDE which is a simple editor available for on-line editing of the source code files.
Using the icons and the help of the following set of screenshots, create a new file,
name it hello.py and insert a simple Python program.
We will now create a so-called commit. Commit in Git captures the current state of the project and can be seen as a named version. In fact, whenever you create a commit, Git will ask you for a Commit message where you are supposed to describe what changes you made.
For now, we will be making all changes directly to the Master branch. We will explain the concepts of branches later on, for now take them as a magic that works :-).

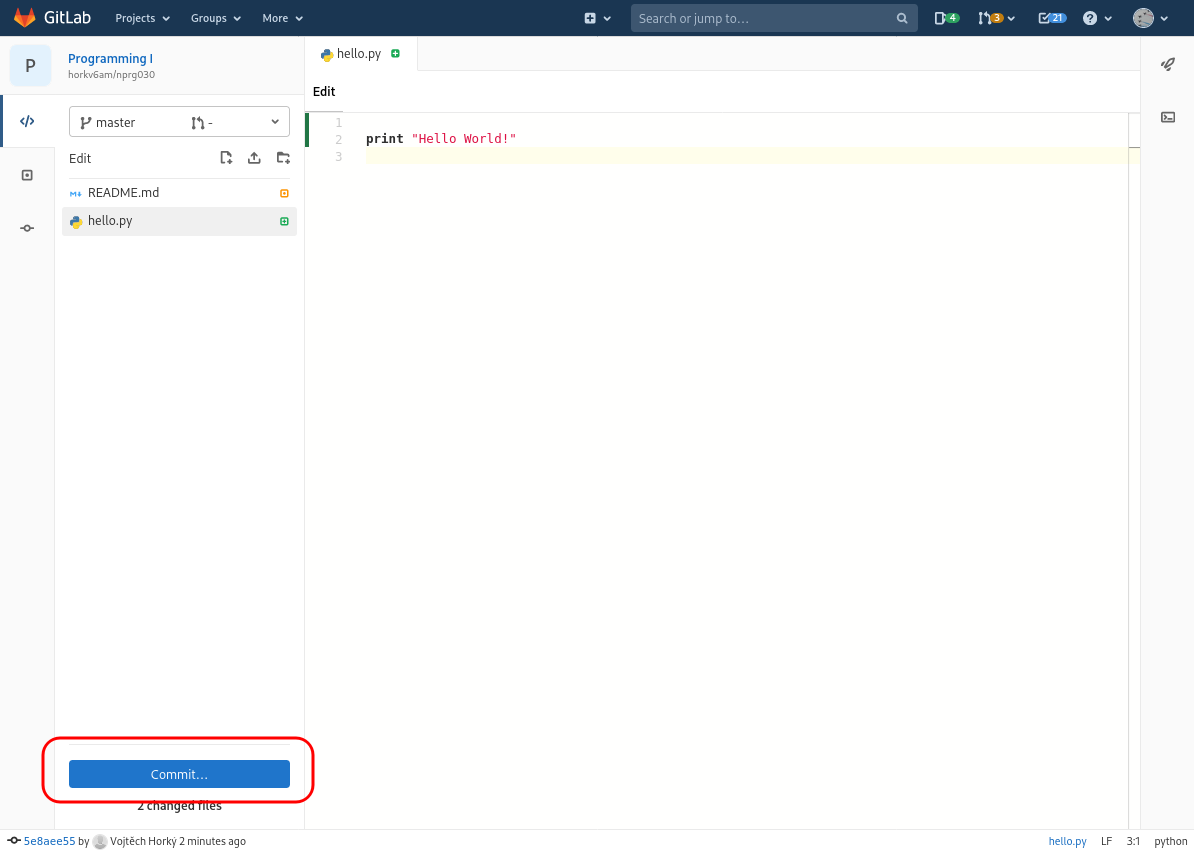
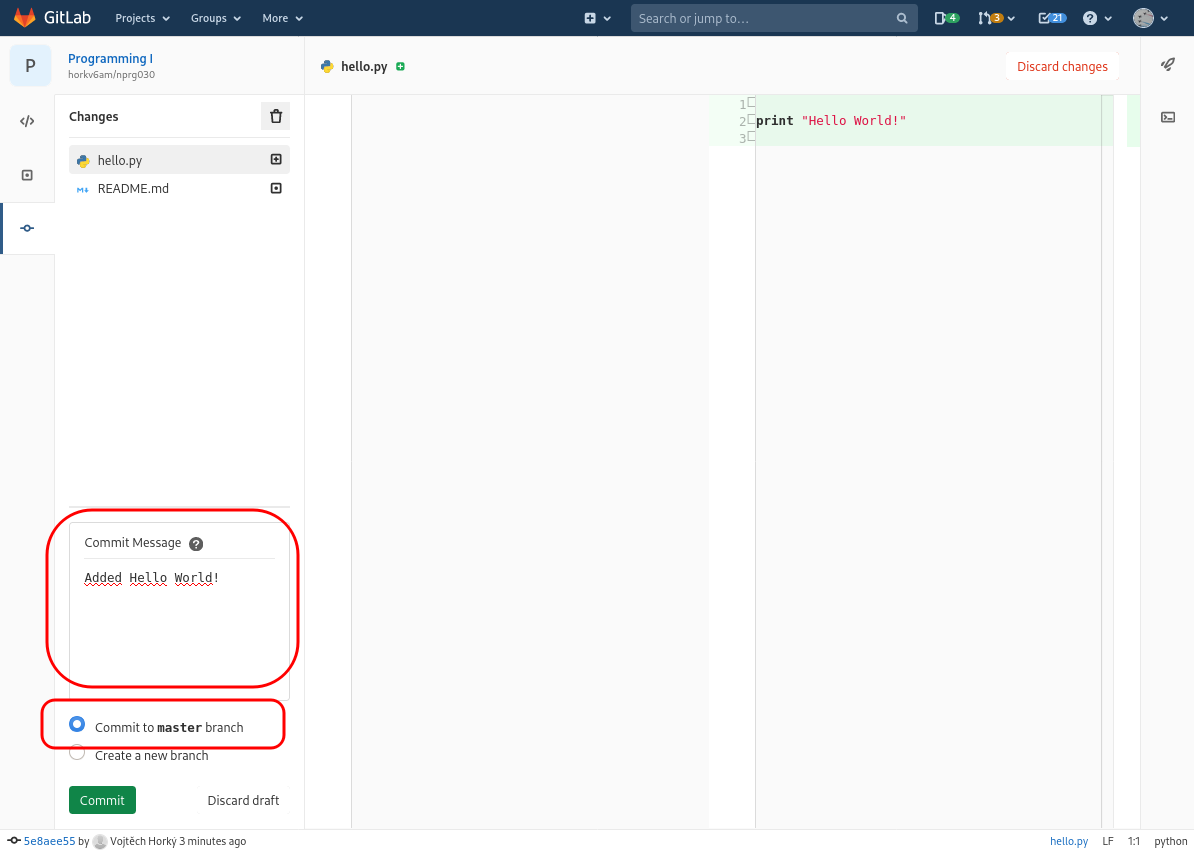
The important thing to remember is that commit assigns a name to a particular state of your source code (revision). Often you will see names such as Add icons to the menu or Fix button typo or Finish Czech translation. As you see, they refer to the state of the project.
Sign-out from GitLab now.
On your own: sign in to GitLab again, find your project and create a new file, pasting in some of your source code. Note that when you click on the filename on the project homepage, you will see its contents and again a link for its editing.
Submitting assignments
We will be using GitLab to submit and evaluate the graded assignments.
We will create a special project for each of you here with your CAS login in its name.
For technical reasons, we can create the project only after you sign-in to GitLab for the first time. We create these projects semi-manually so may need to wait until another day for your project to appear.
Each assignment will have a prescribed filename where to submit the solution. Submitting under a different filename (or to a different folder) means we will not be able to find your assignment (and thus we will count it as not submitted). There are about 300 students enrolled to this course and we need to automate a lot of things: in this sense we really cannot manually look around your project to guess whether you have submitted under a different name.
Filenames in Linux (and on GitLab too) are case-sensitive.
Each submission – more precisely each commit – will launch automated tests on top of your repository. These tests will check whether you have submitted the solution at all and also check whether it behaves as it is supposed to.
Interpreting automated test results
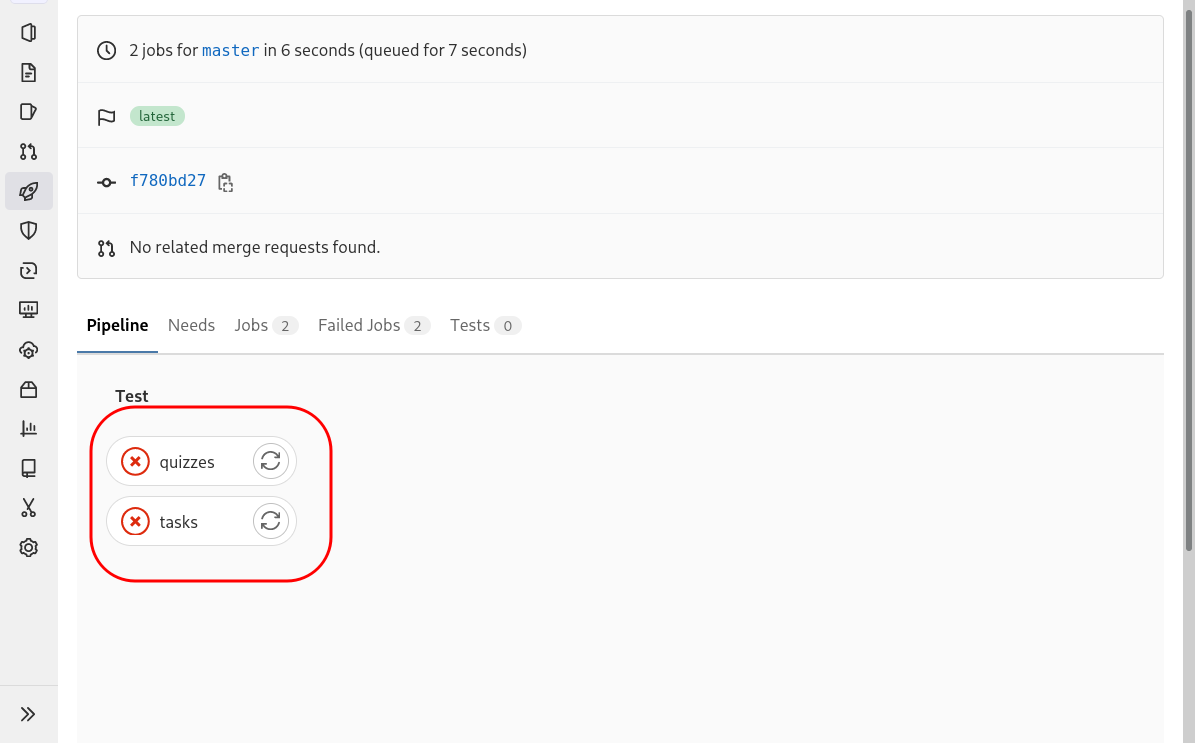
When you open your course project, you will notice that there is either a green or red icon next to your last commit message representing state of your project.
Clicking on the icon will show detailed record of the actual tests. There are two groups – before-class quizzes and post-lab assignments that we keep separate.
Opening either of them will show you a transcript of actions that were performed by GitLab for you.
![]()
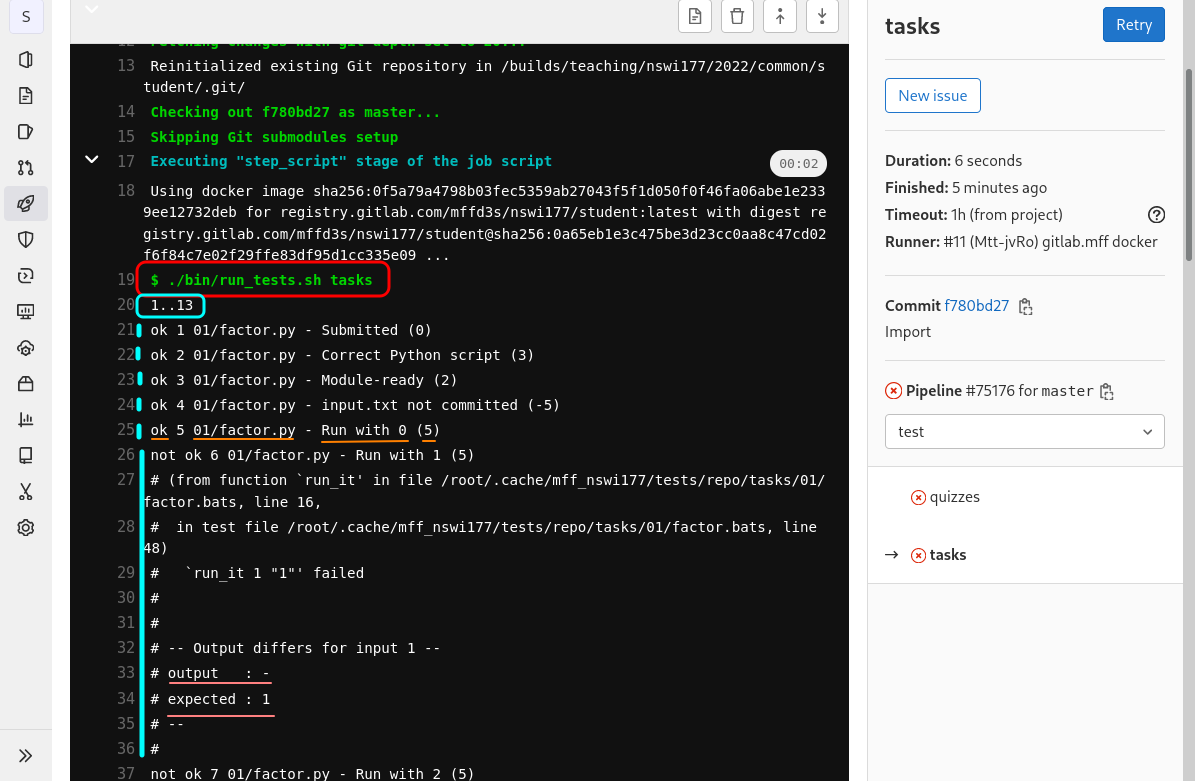
The important part starts with bin/tests.sh followed by text similar to the following.
1..2
ok 1 01/factor.py - submitted (0)
not ok 2 01/factor.py - number 12 (20)
# -- output differs --
# expected (3 lines):
#   2
#   2
#   3
# actual (1 line):
#   8
# --
This is a Test Anything Protocol (TAP) output
that says that it executed two tests (1..2) and one of them was fine
(ok 1 ...) while the other failed (not ok 2 ...).
The message for passing test is rather short – it merely states the name
of the test (01/factor.py - submitted (0)). We will use this format of the
name for tests that merely check that the file is present in your project.
For a failing test, the message again contains the name of the test
(01/factor.py - number 12 (20)) followed by further description of the failure.
TAP uses comment-like syntax of prefixing the lines with extra details with
the hash sign (#).
There we can see that the test expected that the program would output 3 lines
containing 2, 2 and 3. Instead, the program printed a single line with
value of 8.
This should give you enough information of what went wrong. In this case, the program was written in Python so you can debug it yourself as you see fit on your own machine.
Please, do not use GitLab as your development platform. Always debug and implement your solution locally – GitLab cannot serve as a replacement for a missing installation of Python on your machine. The jobs running the tests are executed on a shared machine – let others use the machine as well.
Each test also contains a number in parenthesis after the actual name of
the test (here it is 0 and 20). This number roughly represents the amount
of points assigned for passing this test. The number may be slightly
adjusted during our evaluation if the need arises.
Do not plan to pass with minimum points exactly based on number assigned to these tests.
Their purpose is to represent importance of a particular test, not an exact
amount of points.
If the number in parenthesis is negative, it represents amount of points that
will be subtracted if the test fails. We will use these for tests checking
things you should already be familiar with
(e.g. that you do not use import * in Python).
GitLab also sends you an e-mail when any of these automated actions fails (in GitLab terminology, these are Pipelines and Jobs). You can turn the notifications off but do not forget to check the results manually too.
Graded assignments for this lab (deadline: Feb 27)
The first task is automatically tested by GitLab, the second one is not.
01/factor.py (50 points)
Write a Python program that factorizes a number into a product of prime numbers.
The number will be read from a file input.txt that will contain only a single number.
For invalid input (negative numbers etc.), the program must print a dash -.
Each prime will be printed on a separate line.
You can also consult the results of the provided tests if behaviour in some situations is not clear from the description above.
Important: do not upload the file input.txt into your project. This
file is provided by the tests automatically (but, obviously, create it on
your machine when debugging your solution).
Important: the first line starting with #! is there for a reason and
you have to keep it there (we will discuss this later on).
Also keep the usage of main() and the condition with __name__ as that
represents a proper module-ready code.
Note: we acknowledge that the design of the program is flawed as the input should be specified differently. We will return to it later after we show more about standard inputs and outputs and about program arguments.
Forum confidential issue (50 points)
An Issue in GitLab is a report typically describing an existing bug in a software project. We will use such Issues for off-line communications in this course.
When an issue is marked Confidential, only users with certain access rights can see it. In the case of the Forum project, only teachers can see such issues.
This assignment asks you to create a Confidential Issue on the Forum with the following properties.
- The Title must be
01/issue(no extra characters, please). - Assign the issue to
horkv6am(Vojtěch Horký). - Attach to it the file
/etc/os-releasefrom your Linux (using computers in the IMPAKT or other lab is fine too). Make the attachment link in the Description to read as/etc/os-release. - Below the
/etc/os-releaselink, paste the contents of/proc/loadavgfile as source code (look for Code block formatting in the Help). You will need to open this file in a text editor to copy the contents, do not be surprised that the size is 0 and yet it contains useful content. Again, use a value you have seen on your computer or in the faculty lab when you were logged in. - Below the
/proc/loadavgcontent, write a single paragraph describing which (Linux) desktop environment you have selected and why. Write this paragraph in full sentences. - Leave the issue open (we will close it after the deadline).
The issue before submitting should therefore look like this in the Preview tab.
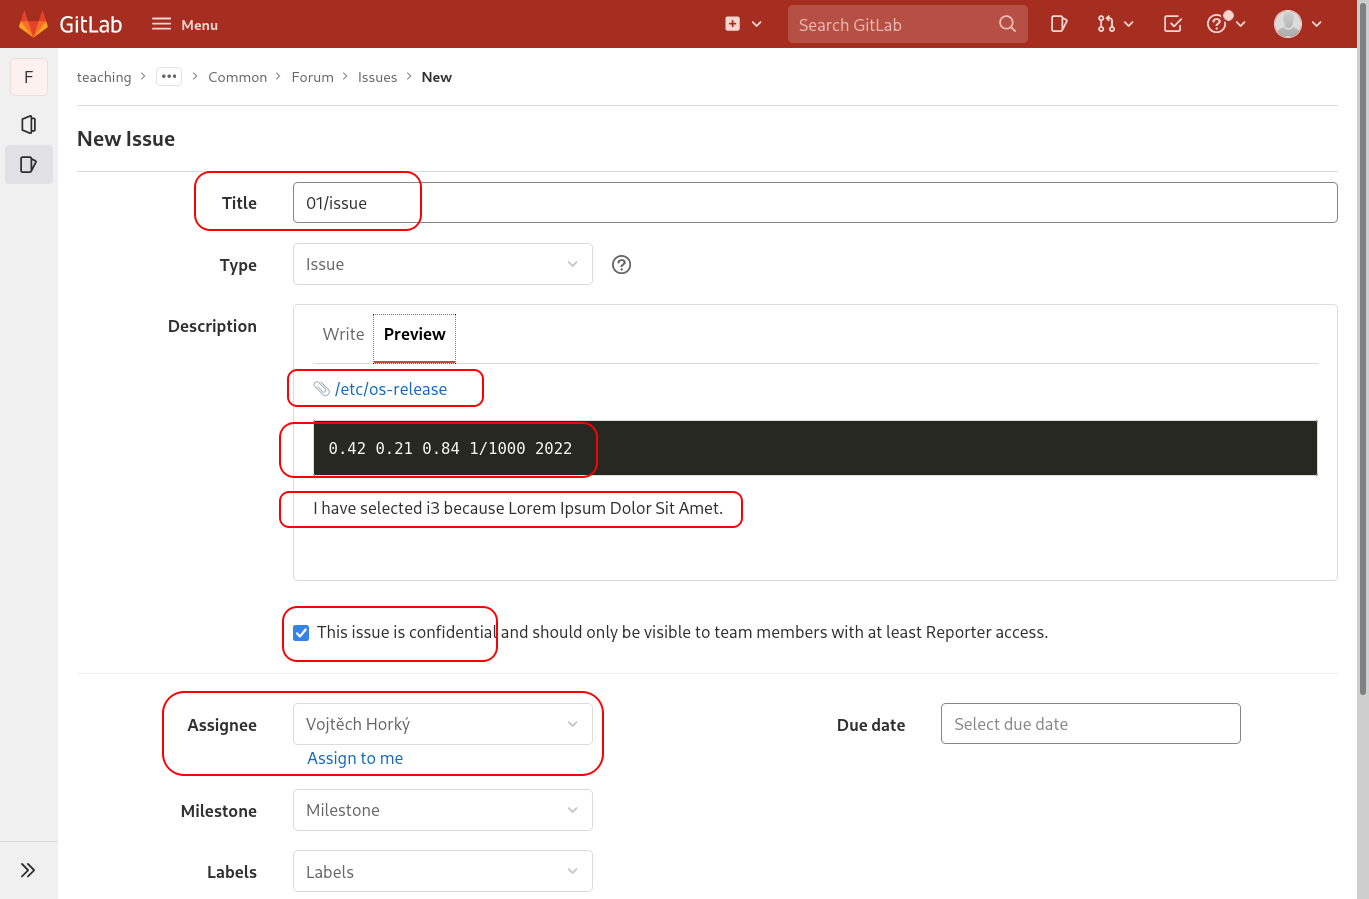
Important: make sure you create this issue confidential. Public issues cause notifications to be sent to all members of the project, in this case it means that all of your colleagues would receive an e-mail they have no interest in.
Learning outcomes
Conceptual knowledge
Conceptual knowledge is about understanding the meaning and context of given terms and putting them into context. Therefore, you should be able to …
-
explain why graphical user interface is not a fixed part of Linux
-
list few types of assets that are typically needed for software projects apart from the source code
-
explain fundamental high-level operations of versioning tools
-
explain what options are for more people to cooperate on a shared source code
Practical skills
Practical skills is usually about usage of given programs to solve various tasks. Therefore, you should be able to …
-
boot your own machine into Linux (either via a USB disk or using a virtual machine)
-
log in to a graphical Linux environment
-
log in to faculty GitLab instance
-
create new project in GitLab
-
create new file in GitLab project and save the changes (create commit) (using GitLab web UI)
-
edit existing files in a GitLab project (using GitLab web UI)
-
customize his preferred (Linux) environment